
How to Make Any Screen a Touch Screen With a Camera

You can make any screen a touch screen without buying new hardware. AirTouch reads your hands through a standard camera and converts gestures into genuine Windows touch events, single touch with one hand or multi-touch with two, so any app built for a touchscreen responds as if you were tapping the glass. Except there is no glass. This tutorial covers touch mode, multi-touch, and how to aim your hands at the right display.
Prefer to watch? The proximity trigger walkthrough is on our video tutorials page, with the full transcript.
New here? Start with the install tutorial, then come back.
Can you make a non touch screen into a touch screen?
Any display connected to a Windows PC can behave like a touchscreen with AirTouch in touch mode. The screen itself stays untouched: a camera watches your hands, and taps, swipes, and pinches arrive at the operating system as real touch input, so the TV on the wall, a projector image, or a video wall becomes interactive in most setups. No touch frame to mount, no overlay, no rewiring. The other route, an infrared touch frame fitted over the display, still works but brings back the thing many rooms are trying to retire: walking up and pressing shared glass. Our smart board alternatives guide compares both paths.
Mouse mode or touch mode: which should you use?
AirTouch runs in mouse mode by default: your hand moves a cursor and a pinch clicks. Match the mode to the app you're controlling. Desktop software built for a cursor (browsers, slides, most clinical viewers) works best in mouse mode. Apps designed for touchscreens (kiosk software, 3D viewers with pinch-to-zoom, map interfaces, signage) come alive in touch mode, because they receive the same tap, swipe, and pinch events a touchscreen would send. One note: turning on Touch automatically turns mouse mode off, though keyboard-shortcut mappings keep working in both modes.
How to turn on touch and multi-touch
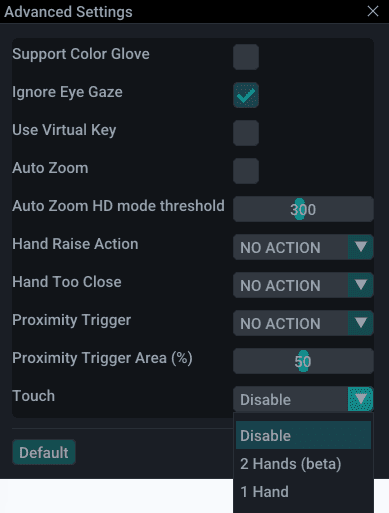
Open Settings and find the Touch drop-down. Choose 1 Hand for single touch, or Multitouch 2 Hands for multi-touch. In multi-touch, the index-plus-thumb pinch becomes tap and swipe, and two hands together drive gestures like pinch-to-zoom and rotate. It's the closest thing to a touchscreen you can have on a screen nobody touches, which is exactly what a touchless kiosk or a museum wall needs.
How to control a specific monitor
With more than one display connected, open Display Settings and choose the monitor where interaction should happen from the drop-down. The display numbers match what Windows shows in its own Display Settings, so there's no guessing. This is how a presenter drives the big room display while their laptop screen stays private, and how a control room aims gestures at the wall monitor rather than the desk.
Custom crop: control part of a screen, or span several
For unusual setups, select Custom Area in Display Settings and enter values for Horizontal Offset, Vertical Offset, Crop Width, and Crop Height. That lets your hand control a defined region of one display, or a custom area spanning multiple displays, useful for video walls, ultrawide signage, and split-screen installations. Display and Camera settings are global across profiles, so the room's geometry stays put no matter which gesture profile is active.
Where this shows up in the real world
Touch mode on a glasses-free 3D display lets a whole room manipulate a model no one is touching; that's the setup behind our immersive display work and the Sony Spatial Reality Display integration. In a conference room, display targeting is what turns the wall screen into the room's shared surface while everyone stays seated.
This wraps the core AirTouch tutorial series: install, gestures, camera, advanced settings, and now touch and displays. Everything else is your imagination and a camera. Start a free trial and turn a screen you already own into a touch screen today.
Related: AirTouch advanced settings, every AirTouch gesture and how to map it, and gesture control and hand tracking software.
Watch the series: AirTouch video tutorials.
© 2026 Neural Lab, Inc.
Designed and built in Sunnyvale, CA